Now that you have all of your parts assembled for making your own Roman-style jewellery, let's get started.
 Step 1: Assemble your materials and equipment and ready your work area
Staying organized will make the project go faster (because you won't be searching for parts or tools). Making sure your work area is clear will also aid in clean up. When I make jewelry, I usually have a plate or a piece of fabric underneath my beads so that they don't roll away and get lost. It's also good to have a photo of your inspiration close by so you can match up as close as you can. (Remember, though, this is recreating with modern materials. You may not be able to make an exact replica, and that's okay.) You'll notice that the beads are kept in little tins - these were cleaned out candy tins, and they're quite convenient for travel. They're also quite convenient to keep your materials all in one spot. So, while not necessary to have, they are nice to have around.
Step 2: Straighten your wire
Wire often comes on spools, and therefore can cause kinking if the wire isn't straightened. Straighten your wire by unspooling small portions of it (about 6 to 12 inches at a time), and making it as straight as possible. If you choose to not work from the spool, take this time to cut your wire into three-inch segments It may seem like a lot, but you'll need the wire. If you choose to work from the spool, do not cut your wire now.

 Step 3: Make and wrap a loop
Loop-making is the first part of making a component for your necklace. When you make a loop, you will go about an inch from the end, take your roundnose pliers, about an inch from the end of the wire and make a 90° bend, so that the wire makes an upside-down L-shape with a loop. The next step is to wrap the loop, where you will take the short tail and wrap it around the longer portion. To do this, hold the loop with the roundnose pliers in one hand, and wrap the tail with the chainnose pliers with the other. Be careful, and don't pull too hard, as this can damage the loop. Go around the longer portion at least twice. This will give it a neat, finished appearance, and was done in period.
You will end up with a loop that has a wrapped portion with a small tail. Take your side cutters, and snip off the tail.
SAFETY ALERT: The tails fly off when you cut them, so do not aim them at people or animals. In fact, if you have a small box to aim the wire into, please use that to help contain the debris. The flying debris is moving fast enough that it may damage what it hits,
so please, be careful.

After you have snipped the tail off, use your chainnose pliers to smooth down the remaining part of the tail. This can be fiddly, so be patient. After you're done, cut the wire at about inch and a half below the loop, which should give you enough room to enough so that you can repeat the loop on the other side of your bead. Your loop should look like this.
Step 4: Bead your looped wire
This is where you stick your bead onto your wire. If the bead does not fit, try reaming out the bead with a reamer. If you do not have a reamer, look through other beads to see if you can fnd some that fit the wire better. If you cannot find one that works, try switching to a wire with a higher-number gauge. (remember, though, that the higher the wire gauge, the smaller the wire circumference and the easier it is for the bead to saw through the wire and break.)
Step 5: Make a second wrapped loop


This part can be tricky, so be patient. When you make your second loop, give yourself a bit of room (a couple of millimeters) between the bead and the bottom of the loop, so that you have room to wrap it. You may also need to move the wraps closer to one another with your pliers, and this can be time consuming, but will make for a better-looking piece of jewellery.
Once it is wrapped, you will be ready to start connecting loops together. This will test your patience, so take a break every so often and let your hands rest, as this can be difficult. It is also important to ensure that the holes are big enough to thread another loop through. I say this, because the next part will involve threading the loop through the next link through its loops.
Follow the directions for wrapping a loop (see Step 3), and snip off the end, bearing in mind the safety precautions. Your beaded component is done, and should look like this.
Putting Your Necklace Together

Once you get the first of your beaded components finished, the next part is to start the process over, taking care to link the next bit of wire through the preceding link to connect them all.
If you look to the side, you can see how it's put together. It's the same general idea as above, but the chain will get longer and longer as you connect more pieces to it through the loops.
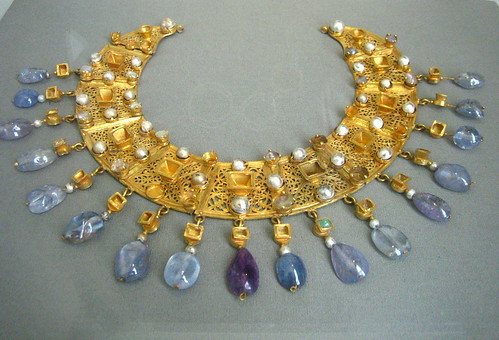
This particular piece has alternating freshwater pearl and amethyst, until it gets to the middle, where it then will have three green beads of some kind. The general rule of most jewellery is to have a sense of rhythm and colour coordination, and the Romans and the Byzantines were no exception. If you take a look at pieces found at the
V&A,
The Met, and
The Walters, you will see a strong sense of colour, a sense of repeating components (a rhythm, if you will) in the materials being used, and a quality of materials.

One of the cool things is looking at the areas and what they were famous for trading in, on a gemological level. Another one of the cool things is looking at the geological make-up of Constantinople and Rome, and how this influenced jewellery in the area.
Most necklaces in this style are short, nearly choker length necklaces. Wear what is comfortable for you. When I make these, I try to bear in mind that the wearer may have a larger neck than the typical Byzantine or Roman noblelady, and that making it slightly larger is okay. To match the approximate length of what appears in the mosaics at Ravenna, make your necklace to fit the base of your neck. It should be close-fitting, but not much longer.
 Finishing the Necklace, or Oh My! I Get to Wear This!

When it comes to a point to put the toggle on, you will need to use jumprings for additional flexibility. Jumprings are not period, however, being able to wear your new piece of jewellery in comfort is pretty beneficial.


When you use jump rings, open them using two sets of pliers (I currently use a set of chainnose and roundnose pliers, but flatnose pliers can be used), taking care to open them by twisting the cut ends away from each other. When you're ready to close your rings, twist them closed.
The finished piece should look very much like this. Of course, this piece isn't completely done, as I will need to go and add the green beads to this, but it should give you a taste of what to look for.
I hope this helps, and if you have any questions, feel free to ask in the comments!
-K
.jpg)

 Now, when I wasn't working on the dalmatica, I was working on the ceremony, which was based on Byzantine functionaries, who were required to swear fealty. I found an oath, and I blogged about it here. I then calligraphied the oath (after clearing the ceremony though Their Majesties), and signed it in court with a quill pen borrowed from my friend Mirabel. My unsigned oath has been photographed, and was based on Byzantine illumination from the Rossano Gospels, which are a purple dyed codex of the Gospels. I did not dye the pergamentata, but I did try my first gilding experiments on this piece. I did put myself in the illumination, but I also put Their Majesties in Byzantine garb. My calligraphy is not the best, but, being a lefty, I do have some issues with beautiful writing.
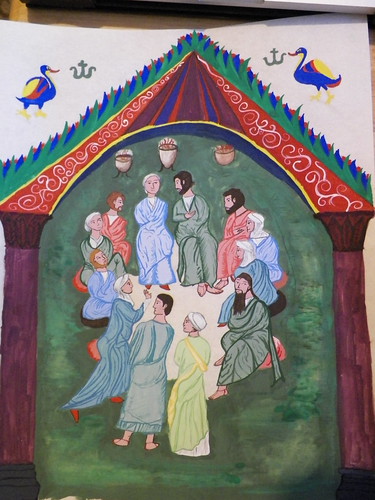


