Sunday, December 1, 2013

Scarab Rings, Pinterest, and You . . er, Me.

Sometimes, I go on Pinterest trawls.  I find awesome things.  Including scarab rings (which are a bit out of period/location for my persona), but also other sorts of rings, including one with a completely wire-wrapped band, intaglio rings with essentially a bead, and plain wire rings.

I was given a carved bead to work with about a year ago, and I wasn't sure what to really do with it until today, when I saw the scarab ring on Pinterest and decided to experiment.


Most of the time, when I experiment, I end up having to try a couple of times to get the results I want.  No exception here.  I first tried with 20 gauge Artistic Wire, and I found it difficult to get enough of a wrap on the bead to stabilise it.  So, I removed that, and went with 22 gauge non-tarnish brass wire, which is a little thinner, and a little less flexible, because of the nature of the brass itself, and just passed it through the bead hole twice.  In period, rings like this are almost all universally made of gold, as far as I've researched.  Gold is a much more flexible material and can be pulled, twisted, wrapped, and manipulated much easier than brass can be.  You'll notice that I also wrapped the brass wire around the scarab bead to keep it from moving around too much.  After all of this, I started to wrap the ring itself, stopping when the wires met each other at the bottom of round.  I then clipped these short and then smooshed (it's a technical term) them so they would lie flat and not get caught on anything.

The ring itself is large enough to wear comfortably on my left pointer finger, but as it's not really my period, I'm going to tuck this away for some largesse basket for my kingdom to give.  I'd be interested to see where this little guy goes off, and hear all of the adventures it has.

I now also have a great way to use up orphan beads, and it really didn't take too long.  In fact, I managed to make another ring today using some of the same techniques as this one, but that one looks quite a bit more suited for modern tastes.

Wednesday, November 13, 2013

Sorry for the Absence!

2013-11-02-1145 by vhersch_rhianydd
2013-11-02-1145, a photo by vhersch_rhianydd on Flickr.
I've had to get some non-SCA life things in order, hence my absence. Let's get caught up, shall we?

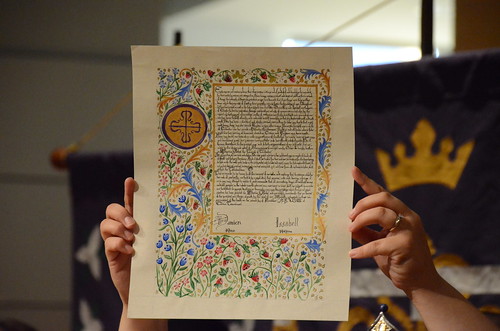
A couple of reigns ago, there was a blank border contest. I entered, and won third place for this entry.

Fast forward to a couple weeks ago. A well-deserving lady was awarded the Calon Cross. The scroll was turned around - and the realisation hit.

I painted the scroll.

Talk about a really cool thing, right?

Monday, September 30, 2013

Surprises, surprises. . .

Photo courtesy of Mergriet van Wijenhorst (Amanda Poirer-Kratz)
This weekend was a pretty big weekend in my Laurel's group of apprentices.  My apprentice-brother, His Excellency, Baron D'Unstable Peregrinator, was made a member of the Order of the Laurel.  Our Laurel all gave us things to do as we could - so I volunteered to make the wreath and the medallion chain.  Syr Yesungge, Bess' husband, made the medallion.  It is all kinds of super-spiff.

While the wreath is not based on anything in particular within SCA-period history, the techniques I used on the chain are the same wire-wrapped links that are used on Roman and Byzantine jewellery.  As for the pressed glass leaves, I'm not sure the periodicity of them.  I'd have to do more research.

Still, congratulations, Your Excellency! 

Saturday, September 14, 2013

Queen's Prize Entry

100_3282 by constantiak
100_3282, a photo by constantiak on Flickr.
It is time for Queen's Prize here in Calontir! This is the novice-level A&S event of the year here.

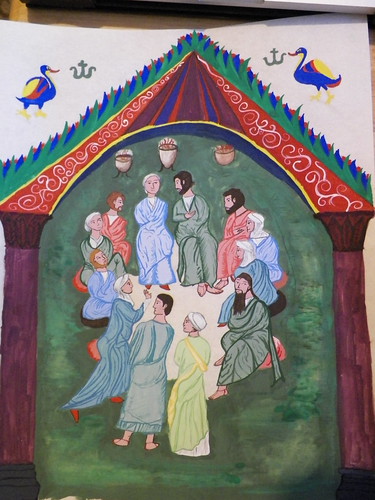
My original plan fell through - encaustic takes time and money that after a trip out of the country and sixty-hour workweeks I didn't really have, so I switched gears and did traditional scribal. I did want to keep it Byzantine (because, hi, me), so I went with this page from the Rabbula Gospels that depicts the apostles and Christ talking about who would replace Judas.

Not much is known about the artist (or for that matter, studio) who painted the Rabbula Gospels, other than his name was Rabbula.  The extant is on parchment (in the photos, the animal's markings are even seen).

Instead of going with this idea and doing a full-blown replica, I went with the idea of past imparting wisdom to the future, by using the first five kings and queens of Calontir speaking to the current king and queen of Calontir.

From the top, going clockwise - Arwyn and Chepe (1st), Cire and Elisabeth (4th), William (Humpk) and Mammara (3rd), Damien and Issabell (60th and as of this writing, current king and queen of Calontir), Asgeirr and Miriam (5th), and Shadan and Erzebet (2nd).

It is unusual to have the men and women in such close quarters, given how segregated Byzantine society was between women and men, and it is doubly unusual to have the women not veiled.  In hindsight, I probably should have veiled the women (modesty was a big deal in Byzantium, especially in the 5th and 6th centuries, and there's an example in the Rabbulas of Mary being completely covered, however, it appears that she is in mourning), however, looking at the royal ladies of Theodora's court in comparison, they're about as covered, though I will point out that the artist may be illustrating the difference in class.

One cool thing I found out is that the extant is just shy of 13"x10", or about the size of the perg (which is close at 11"x14", though this was due to being trimmed to be rebound. That was a really happy day, lemme tell you.

It is commercially produced gouache (Royal Talens) on pergamenata (purchased from John Neal Booksellers).

I am pretty pleased with this piece, though I really need to draw the figures bigger to fill the space better.

If you would like to see the step-by-step process, the scroll diary can be found here: http://www.flickr.com/photos/belle-etoile/sets/72157634999333773/

Additionally, my documentation can be found here.

Wednesday, September 11, 2013

Queen's Prize and other Miscellanea

Hi everyone!

I'm in the process of madly writing documentation for Calontir's Queen's Prize, which is in a few days, and will have an entry mostly consisting of my documentation for my entry soon.  I do exist - but my goodness, so many things to do and see and write about!

I'm hoping to start on some Coptic embroidery soon for a new cloak, but I need to do some more research.  I'll hopefully be putting those notes here so you can see what I've written about.

Until then,

Konstantia

Tuesday, July 23, 2013

And I'm back . . .

100_3108 by constantiak
100_3108, a photo by constantiak on Flickr.
. . . with more projects. So soon after my return from Canada, too! (I came back from my two weeks away yesterday. I have issues.)

I'm part of a group on Facebook called SCA Medieval Barter Town that is somewhat of an offshoot of Noblesse Largesse. People create items for other people, and then barter them off for other items. It's a really cool thing.

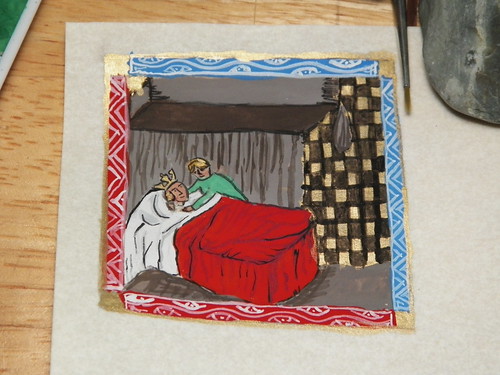
So, I'm working on four blank borders for someone. I've been given some direction - a Roman one, a Norse/Viking one, a 12th c Crusader one, and finally, a 14th c one.

This is the 14th c. one. I'm kind of pleased with it. I need to add some vinework to it, but it's really getting close to what I'd want out of it.

Now I have to get some more pergamenata, and I need to get started on my encaustic projects, too.

Thursday, June 27, 2013

Off to war . . . kind of.

The pieces in the photo - a  paternoster and Roman-style necklace and earrings - are off to be part of a largesse basket for Lochac at Pennsic.  My Princess asked me to help with this, and while I can't be there, this is the second year in a row that I've done something for the largesse basket coming from Calontir.  It's an honour to be asked to do this.

The details of the pieces are as such: the paternoster is strung on silk, with the aves made with 8mm Swarovski pearls, the gauds made with 10mm red glass, and a tassel hand made with silk.  I am not particularly fond of using imitation pearls, as I feel they're too perfect, however, these Swarovski pearls have a similar weight to the real thing, and at a fraction of the cost, it was worth using them.

The necklace I used sodalite, freshwater pearls, coral, plated spacer beads, and a handmade hook and eye clasp, using 18 ga brass wire.  The matching earrings use sodalite, plated spacer beads, and fancy headpins on shepherd hooks.  If I had a jig, and the right sort of wire, I would have probably made the hooks myself - but that's neither here nor there.

So, this gets mailed off today to the largesse coordinator, as I will not be able to attend Pennsic, but for the second year in a row, my stuff will.

Wednesday, June 19, 2013

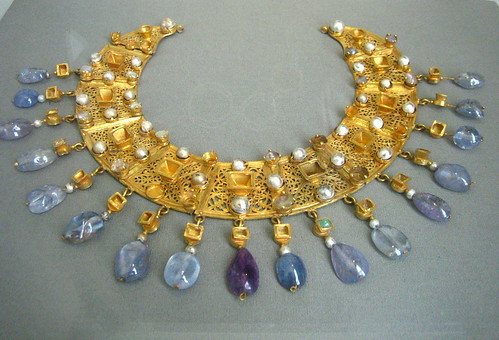
Gold & Sapphire Necklace - Altes Museum, Berlin

I ran across this particular piece on Pinterest, and think it interesting that it's superhumeral-shaped. What if superhumerals are not fabric, but metal?

I'm intrigued, as one of my inspiration pieces for my persona is Theodora with Attendants, which is a sixth century Byzantine mosaic in Ravenna, Italy. In that piece, the Empress is wearing what appears to be a separate collar, but with bezels and the like. Attaching said bezels to fabric is tricky, and can damage delicate fabrics (like silk). If it is a metal piece, like this, it makes more sense. Further more, the Berlin necklace has the same sorts of drops, similarly shaped bezels and prong settings, and does have pearl beads inset into bezels - much like Theodora's collar.

One thing I do find interesting is the loops on the back of the necklace. I'm thinking that this may have been tied shut and was therefore adjustable. It also could have been sewn to a fabric backing.

Also in the realm of cool are the headpins - which are really just eye pins folded under. The piercework is amazing, and the teeny-tiny hinges are gorgeous. I really, really want to try to make this piece.

It's something to think upon some more.

Friday, June 14, 2013

Roman-inspired Earrings

I love Pinterest for finding similarly-minded Roman and Byzantine jewellery fans and for sharing all sorts of awesome.  Including this pair of earrings that's housed at the V&A.  (Provenance can be found here.)

Even though these are a little more complicated than I can do right now, I can at least come close with what I do have.

Let's look at the extant piece: emeralds, sapphires, and pearls.  Emeralds and sapphires can be on the expensive end, but freshwater pearls less so.  Amethyst is another material that was used extensively by Romans, as it invoked the Imperial use of purple.  Instead of pure gold, using hammered brass wire can at least come close.
This set of earrings uses freshwater pearls, gold-plated spacer beads, tumbled amethyst beads, and hammered brass links that I made myself, and then placed onto shepherd-hook earrings.

It is still not as period as I would like, however this evokes the original closely.

See what you've got in your craft stash and see what you can figure out!

Tuesday, June 4, 2013

It's been quiet. . .

I apologise for being so quiet - it's been a bit of a busy time, as I've been commissioned to make items for people - ranging from raffle items to jewellery and paternosters.  This will be a gratuitous item post.

This is a paternoster made for a friend of mine.  She provided the grey beads and asked me to come up with something that would key into her heraldry.  That's where this paternoster came from.  Strung on silk.
I made this for an auction at Horse and Falcons to benefit Unleashed, an animal shelter in my barony.  It was inspired by late Italian and English jewellery.  I used freshwater pearls and coral, as well as gold plated spacers on chain.


 The earrings and the necklace are made for the Lilies Troll raffle, and I wanted something that looked Roman.  The necklace still needs to be finished, but it's nearly done.  Freshwater pearls, coral, and quartz.


For my apprentice-brother, this paternoster is garnet and labradorite.  He has a persona that is a monsignor, and as such, it would be appropriate to have some bling on his person.

Saturday, May 11, 2013

Sidetracked a bit?

Taking a bit of a side journey into another one of my SCA passions: court pageantry and heraldry, and then as a part of that, ceremonies.  As a herald, I love looking at ceremonies.  I find that they bring so much of the medieval aesthetic and yes, even a bit of the mystique and drama to the game that we all play.

With my persona being fairly early period for the SCA (6th century Byzantine), I find that sometimes the standard ceremonies don't quite do it for me.  The Romans, both Eastern and Western, were totally about pomp and circumstance.  I adore pomp and circumstance.  I love it.  Banners, music, jugglers, dancing, really neat clothes . . . yep.  I love pomp and circumstance.

So, I started thinking about what a ceremony would look like in the eyes of my persona.  What would the oaths look like, that sort of thing.  And then I found this.  Take a look here.  (Source, btw, is The Byzantines, edited by Guglielmo Cavallo.  So want this book.  The oath is found on page 203.)

Quick background - this was given in writing (non scripta non est?) to the royals beginning in the fifth century, and then the document remained in the palace archives and listed in a register.  It was required of all high officials of the court, and dignitaries of the empire.  Each new functionary was required to swear the oath prior to investiture.  There's a thing, where, in the 14th c, the provincial governors would gather together at the death of an emperor, resign, and then in front of the new emperor would swear the oath. 

Seriously, for a culture that is all backstabbing and intrigues, they were serious about their oaths and getting everything in writing.

So, here's the period one:

I swear by All-Powerful God, by his only son Jesus Christ our God, by the Holy Spirit, by Mary the saintly and glorious mother of God, forever a virgin, by the four Gospels which I am holding in my hands, by the holy archangels Michael and Gabriel, that I will maintain a pure conscience with regard to our very divine and pious masters Justinian and his wife Theodora, and that I will render them loyal service in the exercise of the duties that have been given to me through their piety; I will willingly accept all pain and all fatigue resulting from the office they have conferred upon me in the interest of the empire and the state.  I am in communion with the holy Catholic and apostolic Church of God; in no form and at no moment will I oppose it, not will I permit anyone to do so, insofar as I am able to prevent it.  I do also swear that I have truly given nothing to anyone nor will give anything for the position that has been conferred upon me or to obtain a patronage, that I have neither promised nor agreed to send anything at all from the provinces in order to obtain the support of the emperor, nor to the very glorious prefects, nor to other famous people who govern the administration, nor to their entourage, nor to anyone else, but that I have been granted my position virtually without salary and can thus appear pure in the eyes of the subjects of our very holy emperors and am content with the sum that has been granted me by the state.

Byzantines?  Wordy?  NAH.  (side note.  I love that both Michael AND Gabriel are mentioned.  This is great news for my encaustic project.)  Now, clearly because this is both a sacred and a secular rite as it was done in period, it may make most Scadians cringe a little with the heavy invocation and swearing to God, Christ, the Holy Spirit, the Gospels, Michael, AND Gabriel, it really can cause issues there.  However, here's the one I've sort of cobbled together from this one to be a little more SCA-friendly, that is not so heavy on the religious end.  I think it works.

I swear that I, _________ will maintain a pure conscience with regard to our very divine and pious masters, King ________ and his wife Queen _________,
and that I will render them loyal service in the exercise of the duties that have been given to me through their piety;
I will willingly accept all pain and all fatigue resulting from the office they have conferred upon me in the interest of the empire and the state.
I am in compliance with laws of the Kingdom of __________; in no form and at no moment will I oppose them, nor will I permit anyone to do so, insofar as I am able to prevent it.
I do also swear that I have truly given nothing to anyone nor will give anything for the position that has been conferred upon me or to obtain a patronage,
that I have neither promised nor agreed to send anything at all from the provinces in order to obtain the support of the emperor, nor to the very glorious prefects, nor to other famous people who govern the administration, nor to their entourage, nor to anyone else,
but that I have been granted my position virtually without salary and can thus appear pure in the eyes of the subjects of our very holy emperors, and am content with the sum that has been granted me by the state.

So, yeah.  Should I ever need to write a ceremony for someone who is Byzantine, I will totally take a look at this one.  It's so cool.

Wednesday, May 8, 2013

Spirals and sunflowers . . .

The surprise I was hiding was the item for my recipient for this round of Noblesse Largesse.  My recipient does Rus.  And I might have exhausted a bunch of non-jewellery options (sometimes I feel I put myself into too much of a jewellery-themed box) before I came back to jewellery.

So, I made temple rings.  The bottom set is based on the Viatachi-style rings, which are pretty much spirals with a hook going in the opposite direction, and the other set is inspired by sets found near the upper Volga River (link to an interesting site about temple rings is here).  The wire I used is commercially drawn permanently coloured copper wire in either 14 or 16 gauge.  (I don't remember which one it is, but it is very thick and somewhat difficult to work with, but I like the results.  And the metal beads were on sale - they remind me a little of sunflowers with the large round middle encircled with petals.  I shaped these with pliers, and with the rings with the beads on them, put the beads onto the wire, and then shaped it just enough so that the beads wouldn't move around a lot.  They still move, and had I experience in using a soldering anything, it may have turned out differently.

One of the things I found was that gold and silver were both appropriate for use in this context.  Studying Byzantine art and jewellery, it almost all seems to be gold, so finding silver, and getting a chance to play with it within the context of a similar culture really is fun.

Photo by Ms. Rhianydd
(V. Herschell - https://www.flickr.com/photos/vhersch_rhianydd/)
In other news: I was given admittance to Calontir's Order of the Calon Cross for my work with Noblesse Largesse.  I am beyond ecstatic.  To the right is my scroll, painted and lettered by HL Neathery of Safita, and the scroll text by Master Andrixos Seljukroctonis.

Still, there is always work to be done.

Seriously.

I have two necklaces to complete prior to 
Photo by Ms. Rhianydd
(V. Herschell - https://www.flickr.com/photos/vhersch_rhianydd/)
May 24th - one for an auction at Horse and Falcon, the other for a raffle for Lilies Gate volunteers.

And then a banner for my barony.  And a banner for my lord.  There's a lot still left to do.  But, it's worth it.

One thing I've learned is that time management skills never get any easier.  On the other hand, the quest for fun and knowledge do wait.  And there's so much more to learn and do and have fun with.

Monday, April 29, 2013

Quick Update

I'm working on a rather secret project right now that will be revealed soon - it's for Noblesse Largesse's current documentation-required swap.  The hint I will give is that the object I've made is for a culture influenced by Byzantine culture, and the object is something shiny.

There will be photos - I promise.

I'm also working through a couple ideas for a Norse banner for my barony, as well as a couple of plans for Knowne World Heraldic and Scribal Symposium in Bjornsborg, and one more big project for Queen's Prize in Calontir that I'm exploring.

A year or so after I had joined the Society, I became enamored with iconography, specifically Byzantine and Rus icons.  Since many of Byzantium's icons were destroyed in the 8th and 9th century, and the few dozen that still exist are at St. Catherine's Monastery in Sinai, there's not a lot of information but what we do have is a handful of icons painted using encaustic paints.

Encaustic painting is painting with pigmented wax, hardened with resin, and applied to a porous substrate (such as wood).  There's a breadth of styles, from rather primitive and almost in a modern chibi style to a naturalistic and realistic style.  It'll take some more investigating, but it certainly looks like fun.

Thursday, March 14, 2013

What's going on now?

So, I'm working on my documentation for the Gallo-Roman necklace.  But, of course, I'm doing more than that - I've got a piece of garb that I'm working on, too!  (Mostly because I might be completely crazy, but I also need garb that fits better, so there's that.)  At any rate, the photos for the Gallo-Roman are done.

I also have a bit of a pictorial dress diary for the tunic that I'm working on, but as sewing is not really my forte (or even patterning, for that matter) that can be found at the following link: New Byzantine Garb Dress Diary!

I'll be posting my documentation for the Gallo-Roman piece when that's finally done, and I'm thinking that there will be an appendix for it.  (I'm a little wordy, as I'm sure you've noticed.)

One thing that I did fail to note on this piece is that the same wire-wrapped technique that the simple Byzantine necklace tutorial covers is the exact same one.  The only difference between this one and the Byzantine necklace is a three strand subdivision between links, which, from what I can tell, is extremely unusual in Roman jewellery.  It's really neat, but can't find much of an explanation for.  Given the amount of wire and time that this took, it is totally possible that this may have belonged to a higher ranking noblewoman (wife or daughter of a magistrate) than perhaps someone of a lower class.

Questions like this will be asked, and we may not always have the complete answer, but we will certainly try to get the big ones (who, where, and how) answered.  Why is much more fun, but will mostly end in conjecture.

Sunday, February 24, 2013

The Gallo-Roman necklace saga . . .

The saga of the Gallo-Roman necklace is over!  I have to finish writing my documentation for it, but the piece is complete.  On a whim, I went to one of my local bead stores (Beadazzler Beads in downtown Overland Park, Kansas), and looking over their selection of Hill Tribes metal, I saw these rather oval-shaped beads.  Sure, they're not exactly what I was looking for, but to capture the essence and the feel of the original piece, they're perfect.  These beads are made of brass, not gold or silver, due to the current prices of precious metals.  (Gold is currently, as of this writing, at $1576, which is down from the high of $1970-something that it was at during Christmas 2012.  Silver is also quite a bit down, as well, at $28.48.)  While the Hmong prefer using silver, as the owner of Beadazzler Beads was telling me, they're expanding their work to brass, given the prices of metal at the moment.  And I am so glad they're working in brass - it keeps my investment costs much lower, and I don't have to learn a new technique if I don't want to.  (I do want to, but not everything needs to be a learning curve.)

Making the clasp was a little less painstaking than I thought it would be.  I used 18 gauge non-tarnish brass wire, the Hill Tribes beads, and the rest of the necklace.  The first thing I started work on was the looped link, as it follows the same technique as the rest of the necklace, making sure that I kept my loops very large.  After this was completed and attached, I started work on the hook.  With the hook, it was better to connect the necklace, thread the bead on, and then shape the remainder of the wire into a hook shape.  The hook also has another loop on it, so that it does not get caught on anything or scrapes skin.  There will be a tutorial on this in the future, so please, look for this.

At any rate, this is done.  Next major project will probably be some illumination based on either the Rabbula Gospels or the Codex Argenteus, unless I get derailed by some other side project.

Paternosters

One of my other great passions in the name of the Society, while out of period for my persona, is paternosters, after stumbling upon http://paternosters.blogspot.com/ a few years ago.  I finished one last night, and used coral, quartz, and quite a few charms, in the same vein as this one from the V&A.  I did end up using different materials, and it does look considerably different, but yet entirely similar.

Paternostering is a relatively easy (and relaxing) A&S activity, though much of the research is still being done, given that grave finds rarely have a complete strand of beads strung in situ.  That being said, I've recently uploaded my documentation (found here and here) from a competition I was in that was based around a monk's life.

There will be a few more entries on other types of prayer beads as I get more research done on these, though these resources are proving to be a bit more difficult to find.  That being said, beads are a wonderful expression of both modern and medieval faith, and it's a great way to outfit a complete SCA kit.  Paternosters are one of those great little items that no proper medieval person would have gone without, both to show piousness and to show wealth as well.  And, if you couldn't bear to wear one with a cross, you could always wear one with a tassel on it instead.

Wednesday, February 20, 2013

Gallo-Roman Necklace - DONE! (well, mostly.)


I finished the Gallo-Roman necklace.  It took about six hours (I did take frequent breaks, so that's some of it), and most of my 24 gauge copper wire, but that was from wrapping all the links.  The time-consuming part - the links - is done.  You can see some of the reason this was so time-consuming in the photo to the left.  Each section required three separate lengths of wrapped beads, connected to a singular link.  In addition to this, the smaller beads are quite a good bit smaller than what I normally wire-wrap, and pearls are quite a bit softer and more easily marred by errant pliers.  That being said, this part is done.  The bad news is that there's still more that I need to do with it - and that is make a clasp.  I have a temporary clasp (because I did wear this to the office to have my coworkers ooh and aah over it), but if I'm going to enter the piece into A&S competition, I want something that is plausibly period - and I want it to look the part.  So, I want to have a clasp that looks right.

So, you see, it's a bit difficult to find beads that look like the original's elongated heart/spade/arrow shape.  I know.  I looked.  You can get kind of close, but I want something that could be a near-perfect replica with the modern materials that I have available.  After talking with one of my friends, who happens to be a Laurel, he suggested that I look at getting gold-clad brass sheet, cutting out the shapes, putting a crease in those shapes, soldering both sides together, and then running the wire through to complete the clasp.

I've never soldered.  Most of the metalwork I do involves cutting and wrapping wire around itself.  That being said, provided I can get assistance and help, this could be doable.  Hopefully, once I learn this technique, I can move onto other ones, like piercework, which was also used in Byzantine jewellery.

Sunday, February 17, 2013

Oooh! Purple!

I found some gorgeous amethyst a few days ago that I'm using in an interpretation of the Gallo-Roman necklace.  The original piece uses emeralds, according to the Louvre, but emeralds are a bit cost-prohibitive right now, and amethyst is found world-wide.  There is even a variant of amethyst that's called rose de France, which is a rather light shade of purple.  Now, the amethyst I have is emphatically not this shade of purple, but this is where I'm going to be a bit more creative and take a few more liberties with the process.  The larger pieces of amethyst are from my veritable hoard of amethyst, and it pairs decently well with the darker purple of the smaller pieces. 

At the same time, I've finished another piece - the bead-along piece.  It will be headed off to its owner soon (my friend Anna, of Anna's Rome).  You might notice the change in the green materials - I found some agate or bloodstone (I can't remember which it is) and used this as my emeralds still have not been recovered.  I find it interesting the simplicity of this single strand between locations in the time-space continuum, but at the same time, the similarity of materials only affirms the Roman aesthetic and use of colour between cultures.  It is utterly fascinating to me.
So, back to the Gallo-Roman piece: it's very nearly complete.  I will need to do another set of the freshwater pearls, and then another set of the amethyst, and then I'll have to figure out what I'm going to do about the clasp, as I haven't found an acceptably-shaped bead yet.  If needed, I may see what I can do about getting some Precious Metal Clay in gold, and make two leaf/blade-shaped beads to put on wire and to use as the clasp.

Sunday, January 27, 2013

Roman Wirework Jewellery

Now that you have all of your parts assembled for making your own Roman-style jewellery, let's get started.

Step 1: Assemble your materials and equipment and ready your work area

Staying organized will make the project go faster (because you won't be searching for parts or tools). Making sure your work area is clear will also aid in clean up. When I make jewelry, I usually have a plate or a piece of fabric underneath my beads so that they don't roll away and get lost. It's also good to have a photo of your inspiration close by so you can match up as close as you can. (Remember, though, this is recreating with modern materials. You may not be able to make an exact replica, and that's okay.)  You'll notice that the beads are kept in little tins - these were cleaned out candy tins, and they're quite convenient for travel.  They're also quite convenient to keep your materials all in one spot.  So, while not necessary to have, they are nice to have around.


Step 2: Straighten your wire

Wire often comes on spools, and therefore can cause kinking if the wire isn't straightened. Straighten your wire by unspooling small portions of it (about 6 to 12 inches at a time), and making it as straight as possible. If you choose to not work from the spool, take this time to cut your wire into three-inch segments It may seem like a lot, but you'll need the wire. If you choose to work from the spool, do not cut your wire now.


Step 3: Make and wrap a loop

Loop-making is the first part of making a component for your necklace. When you make a loop, you will go about an inch from the end, take your roundnose pliers, about an inch from the end of the wire and make a 90° bend, so that the wire makes an upside-down L-shape with a loop.   The next step is to wrap the loop, where you will take the short tail and wrap it around the longer portion. To do this, hold the loop with the roundnose pliers in one hand, and wrap the tail with the chainnose pliers with the other. Be careful, and don't pull too hard, as this can damage the loop. Go around the longer portion at least twice.  This will give it a neat, finished appearance, and was done in period.

You will end up with a loop that has a wrapped portion with a small tail. Take your side cutters, and snip off the tail.

SAFETY ALERT: The tails fly off when you cut them, so do not aim them at people or animals. In fact, if you have a small box to aim the wire into, please use that to help contain the debris. The flying debris is moving fast enough that it may damage what it hits, so please, be careful.

After you have snipped the tail off, use your chainnose pliers to smooth down the remaining part of the tail. This can be fiddly, so be patient. After you're done, cut the wire at about inch and a half below the loop, which should give you enough room to enough so that you can repeat the loop on the other side of your bead. Your loop should look like this.

Step 4: Bead your looped wire

This is where you stick your bead onto your wire. If the bead does not fit, try reaming out the bead with a reamer. If you do not have a reamer, look through other beads to see if you can fnd some that fit the wire better. If you cannot find one that works, try switching to a wire with a higher-number gauge. (remember, though, that the higher the wire gauge, the smaller the wire circumference and the easier it is for the bead to saw through the wire and break.)

Step 5: Make a second wrapped loop

This part can be tricky, so be patient. When you make your second loop, give yourself a bit of room (a couple of millimeters) between the bead and the bottom of the loop, so that you have room to wrap it.  You may also need to move the wraps closer to one another with your pliers, and this can be time consuming, but will make for a better-looking piece of jewellery.

Once it is wrapped, you will be ready to start connecting loops together.  This will test your patience, so take a break every so often and let your hands rest, as this can be difficult.  It is also important to ensure that the holes are big enough to thread another loop through.  I say this, because the next part will involve threading the loop through the next link through its loops.

Follow the directions for wrapping a loop (see Step 3), and snip off the end, bearing in mind the safety precautions. Your beaded component is done, and should look like this.

Putting Your Necklace Together


Once you get the first of your beaded components finished, the next part is to start the process over, taking care to link the next bit of wire through the preceding link to connect them all.

If you look to the side, you can see how it's put together.  It's the same general idea as above, but the chain will get longer and longer as you connect more pieces to it through the loops.

This particular piece has alternating freshwater pearl and amethyst, until it gets to the middle, where it then will have three green beads of some kind.  The general rule of most jewellery is to have a sense of rhythm and colour coordination, and the Romans and the Byzantines were no exception.  If you take a look at pieces found at the V&A, The Met, and The Walters, you will see a strong sense of colour, a sense of repeating components (a rhythm, if you will) in the materials being used, and a quality of materials.

One of the cool things is looking at the areas and what they were famous for trading in, on a gemological level.  Another one of the cool things is looking at the geological make-up of Constantinople and Rome, and how this influenced jewellery in the area.

Most necklaces in this style are short, nearly choker length necklaces.  Wear what is comfortable for you.  When I make these, I try to bear in mind that the wearer may have a larger neck than the typical Byzantine or Roman noblelady, and that making it slightly larger is okay.  To match the approximate length of what appears in the mosaics at Ravenna, make your necklace to fit the base of your neck.  It should be close-fitting, but not much longer.

Finishing the Necklace, or Oh My!  I Get to Wear This!

When it comes to a point to put the toggle on, you will need to use jumprings for additional flexibility.  Jumprings are not period, however, being able to wear your new piece of jewellery in comfort is pretty beneficial.


When you use jump rings, open them using two sets of pliers (I currently use a set of chainnose and roundnose pliers, but flatnose pliers can be used), taking care to open them by twisting the cut ends away from each other. When you're ready to close your rings, twist them closed.

The finished piece should look very much like this.  Of course, this piece isn't completely done, as I will need to go and add the green beads to this, but it should give you a taste of what to look for.

I hope this helps, and if you have any questions, feel free to ask in the comments!

-K


Saturday, January 19, 2013

Where Have I Been?

I promise I exist.

My mundane life has sort of taken over - but never fear!  I'm going through a couple of ideas for A&S competition that are Roman or Byzantine in scope - but I have to work through them first to see if they're feasible.

Upcoming is still the tutorial on making wire-wrapped necklaces.  I promise I have not forgotten about it.  I do need some help in photographing the process, and that requires more hands than what I was graced with at birth!  Once I wrangle up some help, and have good enough lighting, I'll walk you through the process.

In another realm, one of the really cool things that I got to do for the past Calontir Crown was create two scroll blanks to be handed out to children in the SCA.  The award is called the Queen's Chalice, and one was presented at Kris Kinder, the other at Coronation.  Below is Magda presenting my favourite of the two I painted to one of the children.

photo courtesy of Gary Fox (ska Ruaidhri ua Ceallaigh)


One more thing - I've been running an A&S Secret Santa-type swap on the Knowne World level, and would love to have you join us.  This next swap is #5, and promises to be quite fun!  If you're on Facebook, check out our group at the following link: Noblesse Largesse.

So, yes, that's what's been going on in my world.